Configure Mikrotik RouterOS in Proxmox KVM virtual machine on OVH dedicated server
When I rented a dedicated server at SoYouStart (OVH‘s brand) in early 2015, I choose to install it with Proxmox VE 3.4. Proxmox VE enables you to use two types of virtualization at the same time: OpenVZ containers and KVM.
After my dedicated server setup has finished, an email was received with IP and root login information to access my Proxmox VE shell.
In this article I will use Server.IP as a reference to my Proxmox server IP address. OVH instructs to configure networking using a gateway which is first three octets of Server.IP and the last octet is .254. So my Proxmox was configured with a gateway of Server.254 (on interface vmbr0).
The goal was to configure server in the way the virtual machines running on this server will use private subnet and will be accessible via router (NAT), which runs in one of the KVM machines.
It is system administrator’s choice of router software, so one could go for the great piece of open source software pfSense, but this time I choose Mikrotik‘s RouterOS (for x86) since I am using it with Mikrotik routers for a few years now and I am very familiar with it.
My private subnet will be 10.1.100.0/24, so I have reserved 10.1.100.1 for the KVM router and 10.1.100.254 for the vmbr2 on the server.
Edit /etc/networking/interfaces and add your private subnet virtual bridge (vmbr2).
$ vi /etc/newtork/interfaces
auto vmbr2
iface vmbr2 inet static
    address 10.1.100.254
    netmask 255.255.255.0
    gateway 10.1.100.1
    bridge_ports none
    bridge_stp off
    bridge_fd 0
Be sure to create some type of fallback in case something goes wrong (like you are used to do with firewall, if you configure it remotely). Now restart networking or your server.
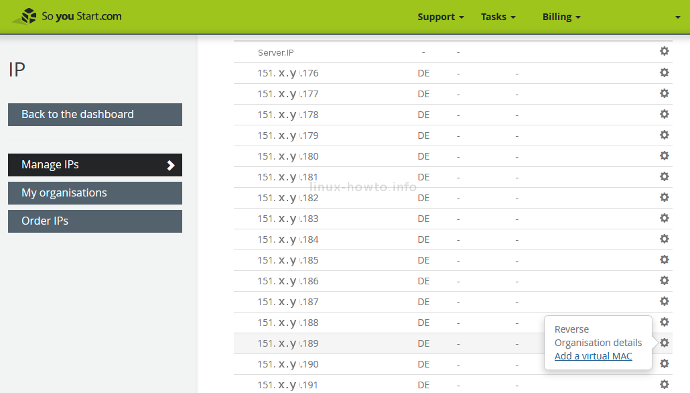
Go back to your OVH/SoYouStart control panel and order some IPs for this server. Order at least a block of 8 IPs (/29) or a block of 16 IPs (/28). You will receive an email with your IP block and explanation how to use it.
I got the block of 151.X.Y.176/28 and the most crucial information is this part:
Network IP              : 151.X.Y.176
IP for router n°1       : 151.X.Y.188
IP for router n°1       : 151.X.Y.189
Gateway IP              : 151.X.Y.190 (not usable)
Broadcast IP:           : 151.X.Y.191
This means my KVM router will have WAN address 151.X.Y.189 (Router.IP) and I can use all other IPs (151.X.Y.177 – 151.X.Y.188) to NAT to my private subnet with virtual machines.
Again, go back to your SoYouStart control panel, select your server and Add a virtual MAC to the Router.IP (MAC type OVH).
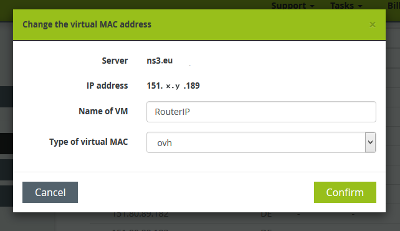
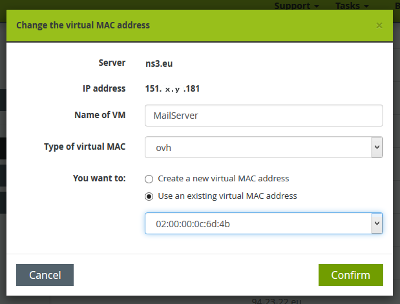
Add this existing virtual MAC address to all your IPs that will be routed via your KVM router.
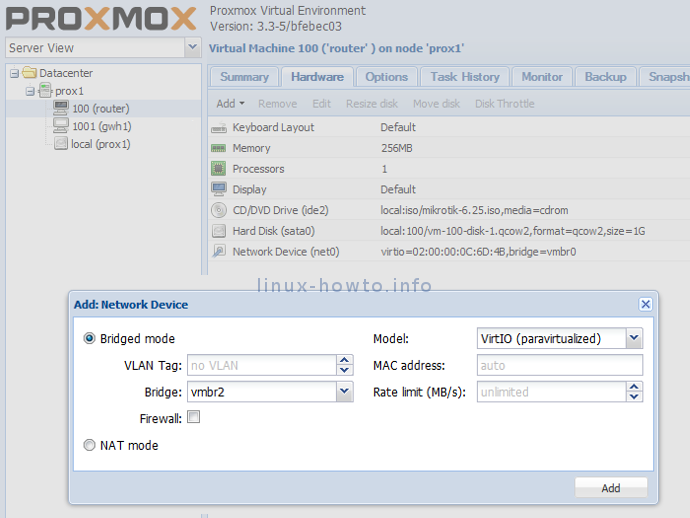
Now it’s time to download RouterOS (CD ISO image for x86) and upload it to your Proxmox VE server. Create a new virtual machine (router KVM) with 1 CPU, max. 256MB RAM, some hard disk and a network device in vmbr0 (with your OVH virtual MAC address).
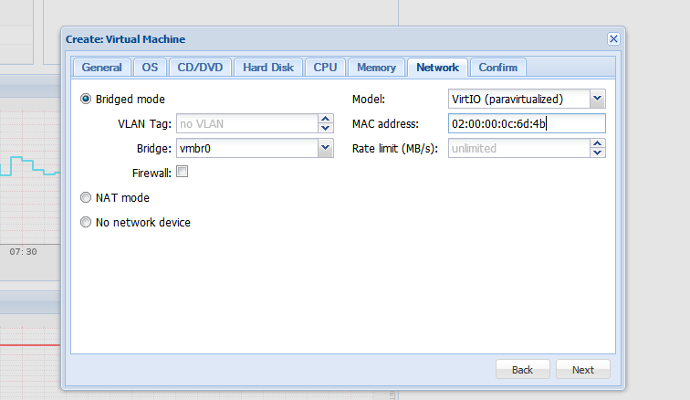
In the Hardware tab add another network device (in vmbr2), mount RouterOS ISO image and install it.
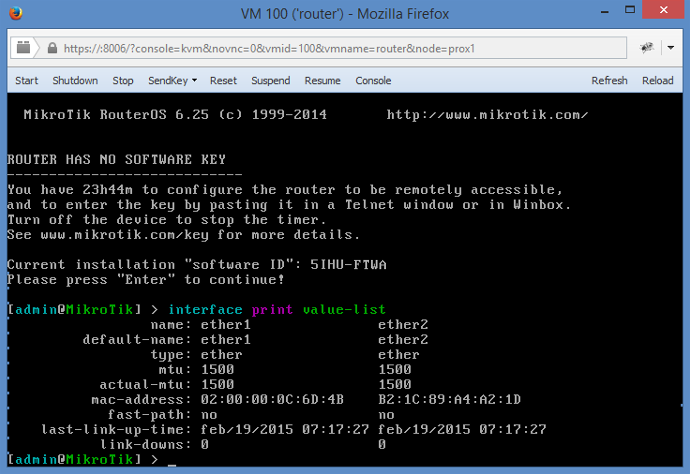
Log in to your RouterOS KVM router with admin/<no password> and write down the software ID which you will need to buy the RouterOS license (you have 24h to buy and enter a valid license). I bought a license at mikrotik-routeros.net. It was great price, fast and no problems.
In RouterOS terminal issue a command to print interfaces and find out, how is named the one which is in vmbr0 and has your OVH virtual MAC address.
This is your WAN interface and the other is your LAN (private) interface.
[admin@Mikrotik] interface print value-list
In my case the WAN interface was named ether1 and my LAN interface was named ether2.
Configure your router (replace 151.X.Y.189 with your Router.IP):
[admin@Mikrotik]
/ip address add interface=ether1 address=151.X.Y.189/32 broadcast=151.X.Y.189
/ip address add interface=ether1 address=151.X.Y.189/32 network=Server.254
/ip route add dst-address=0.0.0.0/0 gateway=Server.254
/ip firewall nat add chain=srcnat out-interface=ether1 action=masquerade
/ip address add interface=ether2 address=10.1.100.1/24
That’s it. The basic configuration of your KVM router is up and running.
Now you can add virtual machines/containers with their network interface in vmbr2.
Use your private subnet IPs (10.1.100.0/24) and your private router address (10.1.100.1) as their gateway. Configure dst-nat/src-nat on your router and your services are set.
Do not forget to secure your server and configure firewall!
If you have any additional questions, do not hasitate to ask or just leave a comment.